Photograph by Robert Llewellyn from the book American Gargoyles – Spirits In Stone
Where John Angel left off in 1940, Simon Verity finishes in 1996. On the left in the above image we see the anteater-like carving on the periphery of the Portal of Paradise by the sculptor John Angel. On the right, looking at the curious grotesque, we see the dog carved by Simon Verity. This intersection of carvings, some 50 years apart, calls out the difference in style between these two. Angel used the Renaissance technique of creating clay models for the carvers, then carving final details where needed. Verity, trained in the Gothic tradition, used no models. He carved directly into the stone working from sketches and drawings. This little corner of the Portal of Paradise leads us from John Angel to Simon Verity.
There is more to the story. Let’s look at a little larger view of this area.
Noah, Dog and Anteater
The statue of Noah by Simon Verity is part of the Portal of Paradise statues. The face of Noah is that of James Parks Morton, Cathedral Dean. Verity used many Cathedral and neighborhood people as models. The dog is Dean Morton’s beloved Pembroke Welsh Corgi, Pepe.
An ad for Barr, Thaw & Fraser proudly proclaiming their work of hand carving the altar screen for the Cathedral.
A reredos is a decorative screen above and behind the high altar. The reredos was structurally separate from the altar ( as compared to retables, a similar paneled, decorative screen attached to the altar back). Highly carved stone or wood panels provide niches for statues and the religious iconography. We are going to explore the evolution of the Cathedral reredos and look into the question of where did the reredos go.
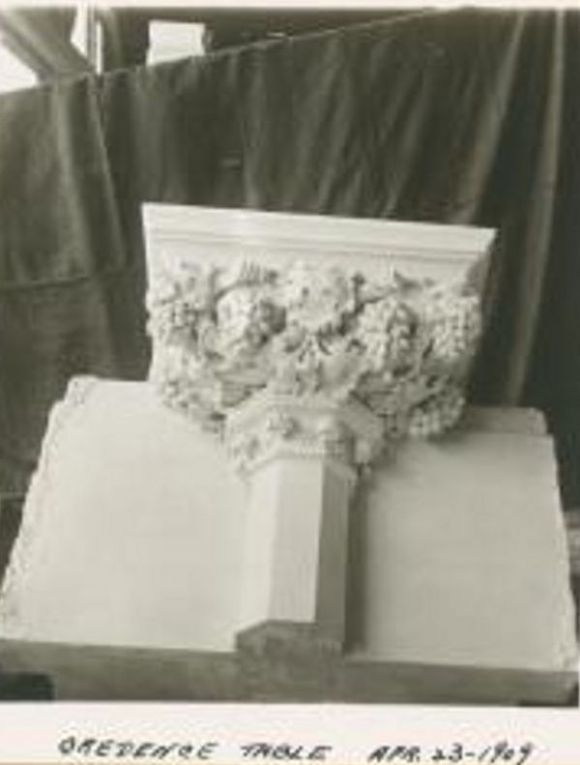
The image below shows the reredos under construction in June of 1909. This was a period that involved the many decorative elements of the interior of the Choir and the Chancel. Architect George Lewis Heins had died in 1907 and his partner Christopher Grant LaFarge was still supervising work on the Cathedral. Their contract, however, ended with the death of one of the partners.
Partition of Reredos, Credence Table in place
Limestone, cut and carved for the screen, came from The Pierre de Lens quarry in Mouleon, France. This creamy white Oolitic limestone has a fine compact grain structure very suitable for carving and sculpture.
Pierre de Lens quarry
Sculpted Clay Models
Carl Bitter modeled the sculpture of Christ. Leo Lentelli of Barr, Thaw & Fraser carved it. Otto Jahnsen modeled the other figures. They were all carved by Barr, Thaw & Fraser. Following are images of those models:
The finished stone figure of Christ will be seven feet high, those of Moses and John the Baptist will be six feet 5 inches.
From the left, models for Isaiah, Jeremiah, Ezekiel and Moses. Old Testament figures
From the left, models for St. John the Baptist, St. Peter, St. James, St. John. New Testament figures.
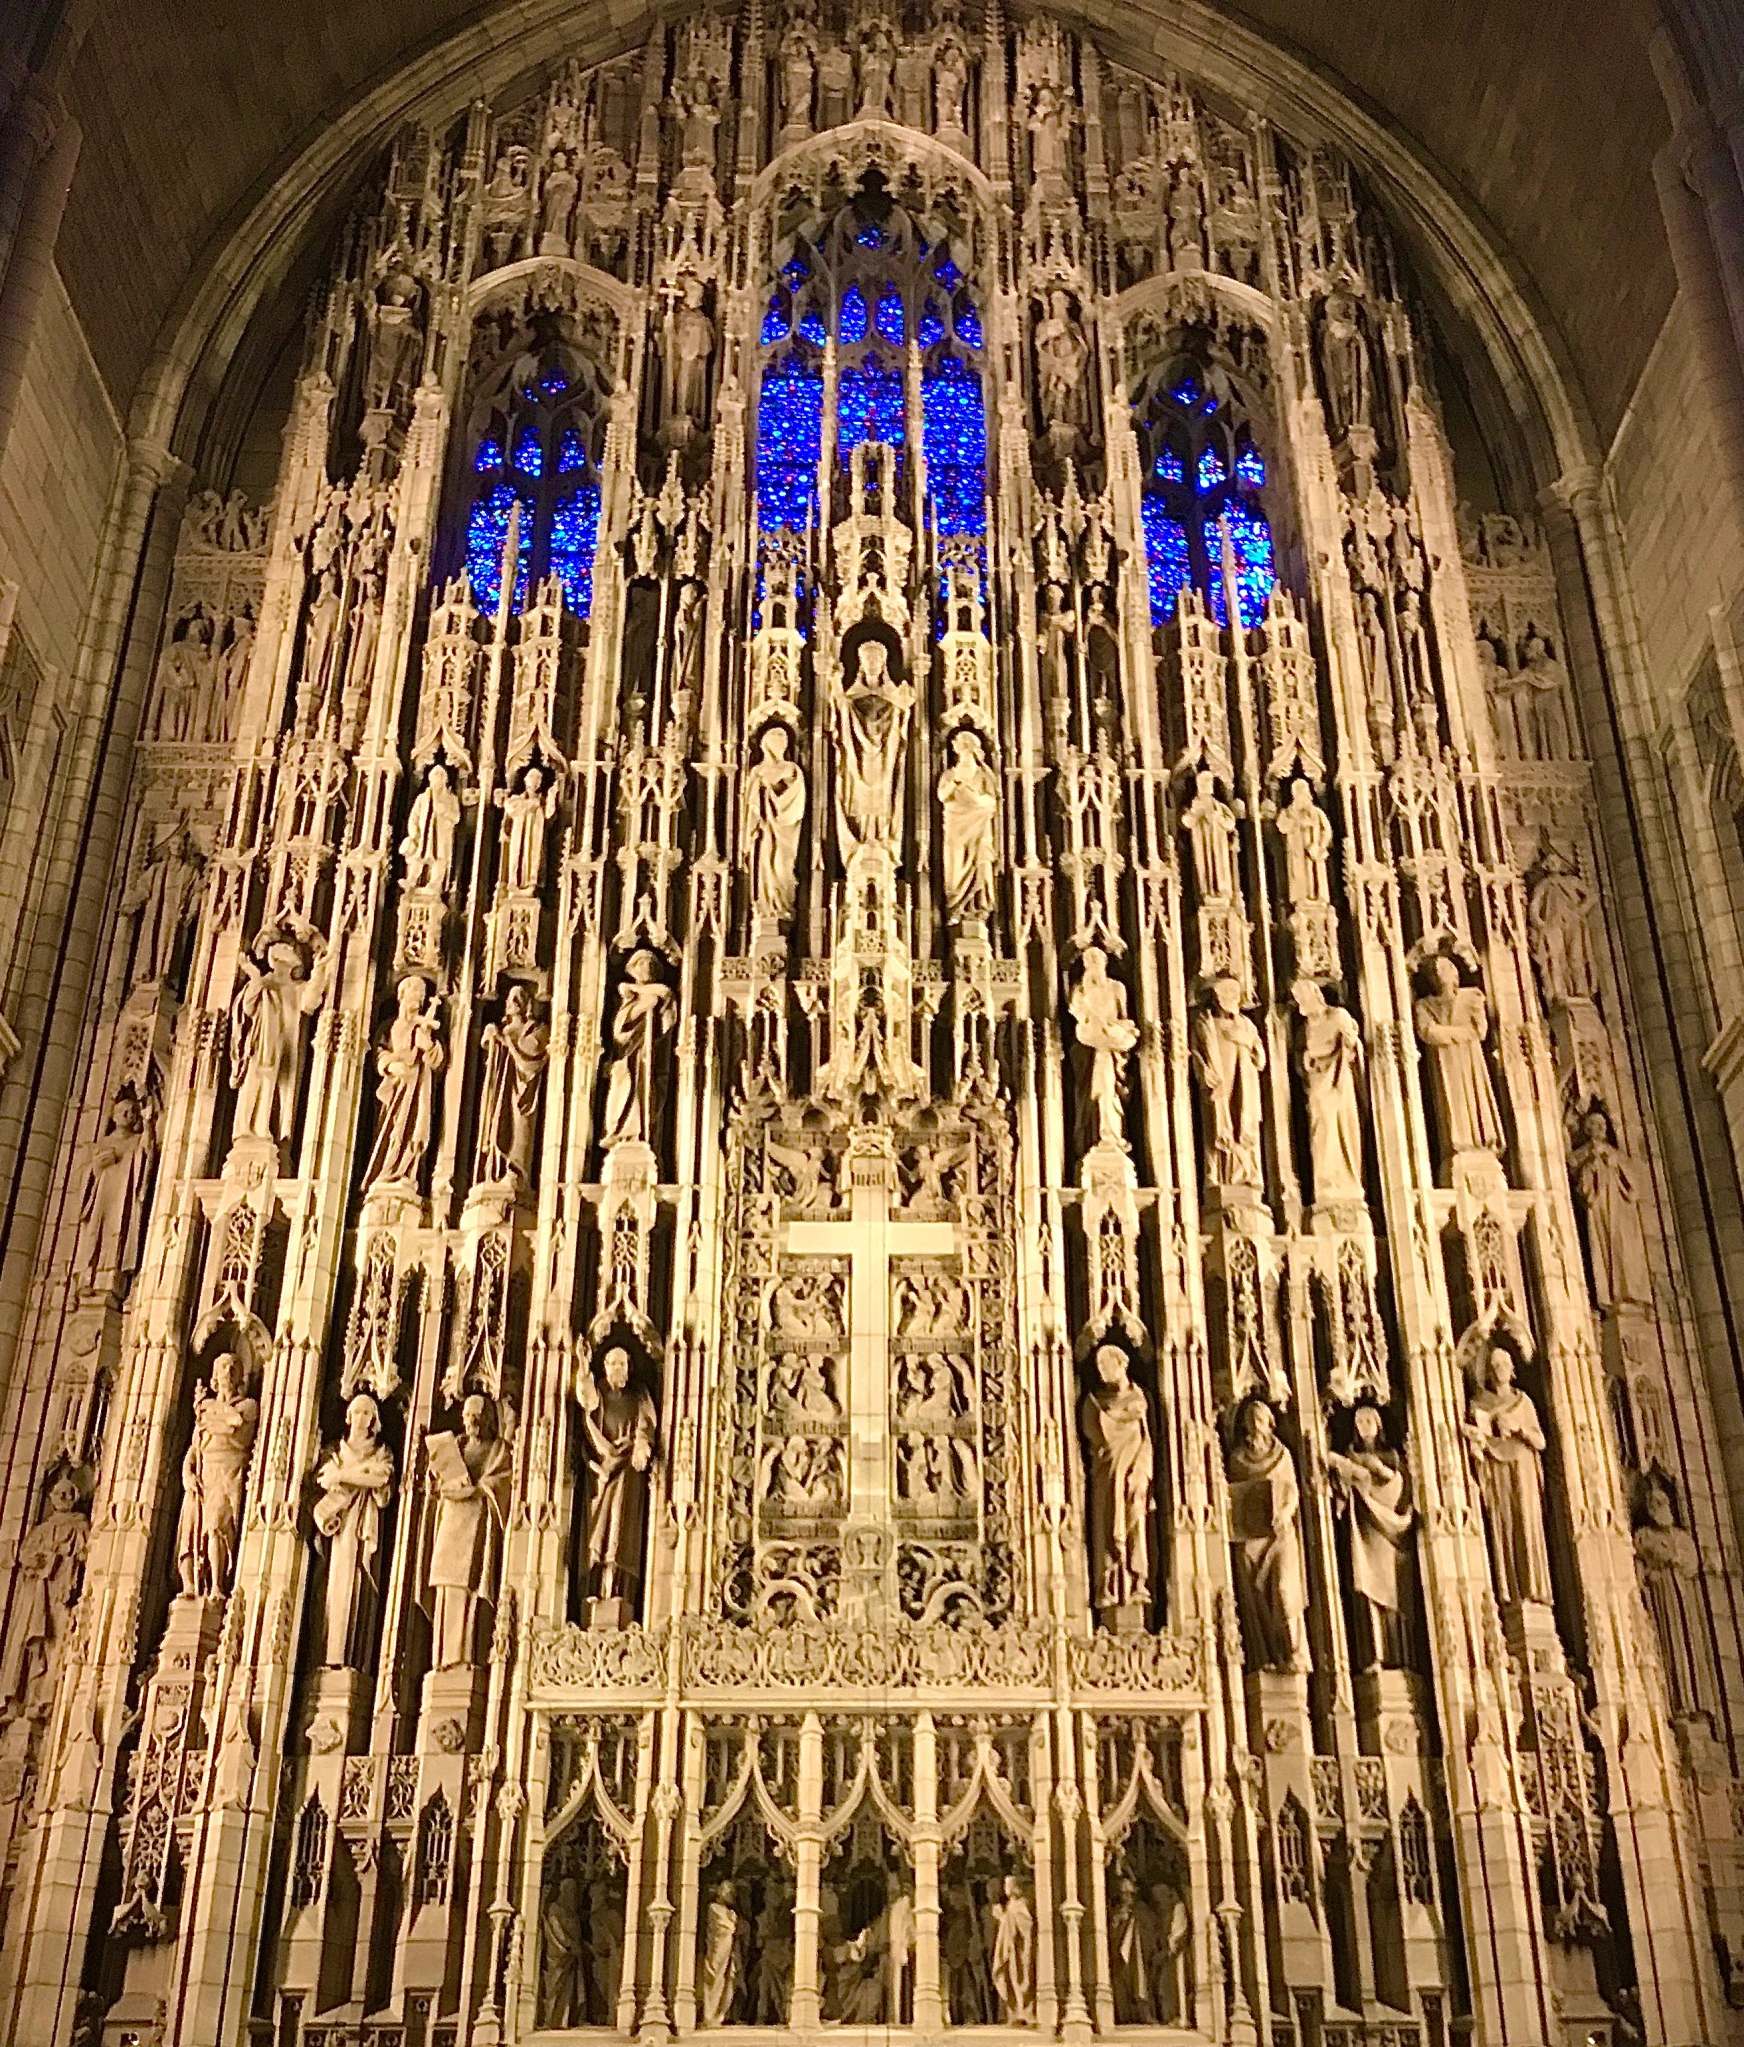
The completed reredos is part of the 1911 consecration of the partial Cathedral.
Reredos as seen from Choir
The New Architect Weighs In
The altar screen was perhaps a little underwhelming in the context of the Heins & LaFarge era Choir and Sanctuary. We know that Ralph Adams Cram, the successor consulting architect, praised those in Seville. In a letter to Bishop Manning in 1935, Cram wrote –
“Having lived in the shadow, so to speak, of the Seville reredos, I realize its incomparable majesty and its unique place in the sphere of religious art. I thought I could visualize the cathedral, when once the choir is reconstructed and the great screen taken down, with this great area of smoldering gold drawing the whole thing together”
– Ralph Adams Cram
Reredos at Seville Cathedral
Perhaps the best example of reredos is in St. Thomas Church in Manhattan. The church was designed by the partnership of Cram and Goodhue. Architect Bertram Grosvenor Goodhue and sculptor Lee Lawrie designed the reredos. It was carved by the Ardolino Brothers. The church opened in 1913.
Lee Lawrie’s reredos in the Cram and Goodhue designed St. Thomas Church at 53rd Street and 5th Avenue
Bishop Manning Presides over Removal of the Reredos
On October 14, 1945, a special service marked the new appearance of the high alter and sanctuary. Bishop Manning, clerical members, trustees and staff gathered on the steps leading to the sanctuary. A curtain hid the altar area while the altar screen was being razed. The curtain was removed to reveal an unobstructed view from the great western entrance to the eastern window at the back of the chapel of St. Saviour.
High Altar with Reredos gone
Closing the ceremony, Bishop Manning said:
The altar now stands out clearly and dominantly, as it should…those majestic columns around the apse have now come into their own. They were partly hidden and rendered ineffective by the reredos.
– Bishop William T. Manning
In closing, the Bishop expressed appreciation to Canon Edward N. West for the part he played in suggesting this important change and working with the architects to make it happen.
The Senior Guide tells us the rest of the story
Some months ago, I asked Tom Fedorek, Senior Guide and Cathedral historian, what may have happened to the carvings. As I read the words “razed” and “demolished” in various articles I feared the worse. Tom told me that there were remains and he would fill me in. He told me the cross below, now in the Bishops Green was originally atop the reredos.
Cross on Bishops Green, originally atop the Reredos behind the Altar. Image courtesy of Tom Fedorek
The One-Hundred Year old statues are in the Crypt
In the Crypt, Tom has identified all but two of the nine statues that made up the reredos.
Reredos Statues in the Crypt, Tom Fedorek identified these as Ezekiel (holding censer in his left hand), St. James (shape of head, position of hands), Jeremiah, John and Isaiah – Image Devin Yalkin, New York Times
Reredos statues in the Crypt
Moses, damaged, lying on floor of Crypt Photo and caption- Tom Fedorek
Jesus on the left, identifiable because he is taller and larger than any of the other figures. John the Baptist on the right, easily identifiable from his tattered camel’s hair coat. Both on the ground because of damage. Photo and caption- Tom Fedorek
On the left, two of the three Hebrew prophets (Isaiah, Jeremiah, Ezekiel), identifiable from their head coverings. On the right St. James in front, identifiable from his pilgrim’s staff. St. John behind him is not visible in photo, but is identifiable from the absence of a beard. Photo and caption – Tom Fedorek
■
New York Public Library, Digital Collections
Museum of the City of New York
Special thanks to Tom Fedorek for his knowledge of the Cathedral
Philippe Petit holds the index card with details of his high wire walk to dedicate the tower cornerstone at the Cathedral of St. John the Divine. His Sept. 29, 1982 walk lasted 5 minutes and 17 seconds, according to his notes. Other specifics include the rigging configuration and type of cable used and the objective: “bring the 1892 trowel for laying of the Jerusalem stone.” Petit has performed 96 walks, 16 of them at or in the Cathedral. Photo taken at his Shokan, N.Y. home on Sept 14, 2022. Photo – Robert F. Rodriguez
As the 40th anniversary of the dedication of the Southwest Tower approached, I knew catching up with Philippe Petit would be necessary. I met Philippe at his home in upstate New York wanting to capture his thoughts and memories of that day. For me it was an unforgettable day and thanks to Philippe, I got to relive it in his gracious video interview.
Philippe Petit and Robert F. Rodriguez pose for a photo outside Petit’s Shokan, N.Y. home on Sept. 14, 2022. The two met for a video oral history of Petit’s high wire walk at The Cathedral of St. John the Divine to dedicate the cornerstone and begin construction on the south tower. Behind them are the three practice wires that Philippe uses to stay in shape and be ready for the next walk. Photo – Robert F. Rodriguez
Another key to the backstory of that event was my friend Stephen Boyle. It turns out it was not the perfect day for the setting of the Jerusalem Stone. Steve tells me in this video about some of the challenges overcome that the audience wouldn’t see or ever know about.
“The Jerusalem Stone, the first cornerstone of the tower, is located in the second course. Most masons would acknowledge that getting the first course in correctly is one of the most important parts of a project…Since the scaffold was not complete on all four sides, it was not possible to set out the building line in advance of the ceremony…This meant we would have to take an educated guess at where the first stones should go and hope that it worked out (it didn’t but that’s another story).”
– Steve Boyle
My own day was one of mapping out the multiple scenes I wanted to cover. One man, lots of places to be at the same time. I’m thankful for multiple cameras.
(The apprentices in the Cathedral Stoneyard Institute had cut and shaped 4,000 stones between 1979 and 1982. Beginning with simple ashlars, they progressed to more complicated shapes. More would be needed, but the time came to begin fixing stones up on the Southwest Tower, September 29, 1982. The ceremony to begin that construction and the wonderful backstories of that day -40 Years Later-are documented and presented here by photojournalist and Artist-In-Residence Robert F. Rodriguez on the Fortieth Anniversary of that event.)
-RM
Philippe Petit begins his high wire walk across Amsterdam Avenue to deliver a silver trowel to Bishop Paul Moore, who is waiting at the the base of the south tower on Sept. 29, 1982. The ceremony to mark the resumption of construction at the Cathedral after a 41-years hiatus was highlighted by Petit’s high altitude walk. Photo – Robert F. Rodriguez
Instead of walking on a high wire across Amsterdam Avenue to highlight the Cathedral of St. John the Divine’s tower dedication 40 years ago, Philippe Petit could have ended up handcuffed and in jail. There were no permits for the walk, and the NYPD threatened to shut down the preparations for it because the monstrous stones needed for holding down the wires were blocking Amsterdam Avenue. Fortunately, the police relented and allowed the event to go on.
What I did was an illegal walk — I call it a ‘surprise’ walk — to celebrate the fact that we are building again.
– Philippe Petit
His other “illegal” feats include a walk between the towers of Notre Dame in 1971, Sydney Harbor in 1973 and the World Trade Center in 1974.
Philippe Petit studies photographs from the 1982 Cathedral of St. John the Divine tower dedication at his home in Shokan, N.Y. on Sept. 14, 2022. Forty years ago Petit walked on a high wire across Amsterdam Avenue to deliver a silver trowel to Bishop Paul Moore to dedicate the Jerusalem cornerstone and begin construction on the south tower. Photo – Robert F. Rodriguez
Petit devised the plan to deliver an “appropriate symbol to the Bishop for the ceremony.” He searched the Cathedral archives and found a silver presentation trowel made by Gorham Silver Co. that was last used in 1925 by Bishop William T. Manning for the dedication of the nave.
“The idea of building a 20th century unfinished cathedral went right to my heart,” said Petit and led him to offer his wire walking services to the Cathedral.
The Prelude
Chaos reigned on Amsterdam Avenue the morning of Sept. 29, 1982. Stonecutter Timothy Smith helped move massive limestone blocks from the stoneyard shed onto the street for Petit and his rigging crew to secure ground wires to his cable that ran from Amsterdam House to the base of the Cathedral tower.
Philippe Petit stands on someone’s shoulder as he secures and tightens the rigging before his high wire walk across Amsterdam Avenue on Sept. 29, 1982. Photo by Timothy Smith
Once wires were tightened and frayed nerves finally settled, a sense of anticipation then spread across Amsterdam Avenue. The crowd awaited Philippe’s high wire walk.
With media from all over on hand to witness the spectacle, I had to scramble past the blocks to determine the best shooting locations. First I raced to the press area on the roof of Amsterdam House (across the street from the Cathedral), to check the angle, the lighting and which lens I would need to capture the scene. Realizing that if I stayed there to capture Philippe’s walk, I would not be able to photograph from any other position. I couldn’t be in two places at the same time.
I decided to leave a camera on the nursing home roof, prefocused and secured in place, with a remote shutter cord attached. And with an act of faith, I asked the photographer setting up next to me if she would hit the remote shutter button a few times when Philippe started his walk. From there I moved to the steps of the Cathedral for the best shots of the ceremony itself. When I retrieved the camera later I saw it was advanced a few frames and I had a really great image. (That image is the opening image for this blog post.)
A large crowd gathers on Amsterdam Avenue on Sept. 29, 1982 to witness Philippe Petit’s high wire walk across Amsterdam Avenue. Photo-Robert F. Rodriguez
Dean James Parks Morton, wearing a full length liturgical cope of pale gold and white bordered in blue and gold, surveyed the scene while Cathedral clergy, trustees, guests and dignitaries took their seats. Called “an architect, a visionary, and engineer of the arts” by Petit, Dean Morton was the force behind this day of celebration and dedication. Resuming construction of the cathedral using Medieval building techniques as well as hiring and training people from the neighborhood, men and women, was the brainchild of the Dean, who started the Stoneyard program in 1979.
Pamela Morton, the Dean’s wife, recalled the tower dedication as “an enormously high point in his whole time at the Cathedral.”
Dean James Parks Morton takes in the scene during the ceremony to mark the resumption of construction at the cathedral on Sept. 29, 1982 after a 41-year hiatus. Photo – Robert Fuez. Rodriguez
The stonecutters and crew, who had spent the past three years doing the preliminary work of cutting hundreds of limestone blocks for the tower, had a prominent place on the Cathedral steps. Master Mason Alan Bird proudly held a crimson pillow with the ceremonial trowel that Philippe would later deliver to Bishop Paul Moore on the tower. Next to Bird was Stephen Boyle, hired as Assistant to the Master Builder and construction supervisor only a few weeks earlier. Behind them sat the Stoneyard crew: James Jamerson, Timothy Smith, Jose Tapia, Arlene “Poni” Baptiste, Eddie Pizzaro, Angel Escobar, Nelson Otero, Robert Stanley, D’Ellis “Jeep” Kincannon, Cynie Linton, Patrick Hall and Johnny Amstrong.
Stonecutter apprentices have up-front seats on Sept. 29, 1982 to witness Philippe Petit’s high wire walk across Amsterdam Avenue. Sitting in front row are Master Mason Alan Bird, holding a silver trowel on a red pillow, Stephen Boyle, tower foreman. Behind are James Jamerson, architect Ben Weese, Tim Smith (leaning on the steps), Jose Tapia, Arlene “Poni” Baptiste (partially obscured), Patrick Hall (on steps, Eddie Pizzaro. D’Ellis “Jeep” Kincannon, Nelson Otero, Angel Escobar, Cynie Linton and Robert Stanley. Photo – Robert F. Rodriguez
Pamela Morton also had a choice vantage point, from in front of the central portal, to watch Philippe’s walk.
Special guests await Philippe Petit’s high wire walk across Amsterdam Avenue on Sept. 29, 1982. Looking on, to the right and wearing a gray skirt is Pamela Morton, wife of Dean James Park Morton and to her left is daughter Maria Morton. Also pictured are Cathedral trustees F. Coit Johnand wife Holly Johnson to the right of Pamela Morton. Photo – Robert F. Rodriguez
The speeches on the Cathedral steps were mercifully short – everyone came to see Philippe!
Master Builder James Bambridge, who would oversee the tower construction, declared “For the past three years, we have been building our skills, but from today, we shall build this house.” And Bishop Paul Moore doffed his blue hardhat to the crowd when he spoke.
During the ceremony Stephen Boyle got an uneasy feeling. “It suddenly occurred to me that some mortar would be needed to set the Jerusalem stone, and this hadn’t been arranged.” The Jerusalem stone, the cornerstone of the tower, was a gift from then Jerusalem Mayor Teddy Kollek and contains a plaque inscribed in Hebrew, Arabic and English. “Fortunately, there was just enough time to mix up a bucketful of mortar and get it up top.”
From left, apprentice stonecutters Arlene “Poni” Baptiste, Jose Tapia, Master Builder James Bambridge, James Jamerson, D’Ellis “Jeep” Kincannon, Stephen Boyle and Tim Smith pose for a photo in front of the Jerusalem cornerstone on Sept. 29, 1982. Photo – Robert F. Rodriguez
When the speeches were done, a collective silence came over the crowd assembled in front of the Cathedral while everyone waited for Philippe’s walk.
By then, I had raced up the stone steps to the tower to get a clear position to photograph the main event.
The Walk
The slender Petit wore a shiny white outfit and white slippers, purple stockings and a purple sash that supported a holster that secured the presentation trowel.
Philippe Petit crosses Amsterdam Avenue on a high wire to deliver a silver trowel to Bishop Paul Moore to dedicate the Cathedral’s south tower on Sept. 29, 1982. Photo – Robert F. Rodriguez
From the first step Petit knew this wire walk would be “very hard and uncomfortable” since he had little time to assemble the crossing cable and support wires down below on Amsterdam Avenue. He had to walk on the thinner “pulling” cable and not on the more rigid and thicker “walk” cable. All that people below saw was a graceful and focused walk to the tower.
With members of the press looking on at Amsterdam House, Philippe Petit begins his high wire walk across Amsterdam. Photo – Robert F. Rodriguez
Halfway through his walk Petit paused and knelt on the wire.
“When he knelt down there was a gasp and all eyes were on Philippe,” recalled Pamela Morton.
“I was tracking Philippe with a telephoto lens throughout the walk and then I saw him pause and get down on one knee on the wire. When he raised his arm with a triumphant smile, I pressed my shutter repeatedly and knew I had captured the moment.”
Halfway across his high wire walk across Amsterdam Ave. on Sept. 29, 1982, a jubilant Philippe Petit kneels on the wire and raises his arm in triumph On his belt can be seen a silver trowel which he delivered to Bishop Paul Moore who was waiting at the base of the south tower to dedicate the Jerusalem cornerstone. Petit’s aerial walk lasted 5 minutes and 17 seconds. Photo – Robert F. Rodriguez
Of this mid-walk pause Petit said, “In the middle of the wire I got down on one leg to do a ‘salute’ to the Cathedral, and people responded by screaming with applauding.”
Stephen Boyle managed to grab a few photos of the walk with his Instamatic camera while waiting near the Jerusalem stone.
The author Robert F. Rodriguez photographs Philippe Petit as Petit crosses Amsterdam Avenue. Photo by Stephen Boyle
As Petit finally neared the south tower, he said, “I did the last step in a very slow motion” so everyone could really see that he was about to finish the walk. But “for me it was not the end, I walked to the Dean and the Bishop and gave them the precious trowel.” His walk lasted 5 minutes and 17 seconds, although to all those who watched with bated breath, it may have seemed an eternity.
Philippe Petit takes a final slow step to the base of the Cathedral roof after walking across Amsterdam Avenue on a high wire to deliver a silver trowel to Bishop Paul Moore on Sept. 29, 1982. Photo – Robert F. Rodriguez
The Cornerstone Dedication
“In the name of Him Who is the cornerstone…we set this stone,” declared Bishop Moore, who placed the trowel above the Jerusalem stone. Master Mason James Bambridge then spread a layer of mortar under the cornerstone, apprentice Jose Tapia carefully lowered the hoist securing the stone into position, and Bambridge checked the level of the stone to complete the installation.
From left, the Rev. Dr. Robert Ray Parks, rector of Trinity Parish, Wall Street, Philippe Petit, Bishop Paul Moore and Dean James Parks Morton gather around the Jerusalem corner stone on Sept. 29, 1982. “We now declare this stone set and dedicated to the glory of God,” Photo – Robert F. Rodriguez
A sacred and special moment followed with Bishop Moore, Dean Morton, Philippe Petit, several stonecutters and other clergy laying hands on the now secure Jerusalem stone for a silent prayer.
Cathedral trustees, clergy, apprentice stonecutters and Philippe Petit lay hands in prayer on the Jerusalem cornerstone. Dean James Parks Morton and Bishop Paul Moore are seen to the right of the block and tackle. Photo – Robert F. Rodriguez
This incredible artistic feat by Petit was also a great act of faith on the parts of Dean Morton and Bishop Moore. A few moments after the cornerstone laying, Petit and Dean Morton quietly moved to one corner of the crowded tower for an embrace of thanks and congratulations. And, perhaps, a sigh of relief.
Philippe Petit and Dean James Parks Morton embrace after the ceremony marking the resumption of the Cathedral’s construction. Photo – Robert F. Rodriguez
■
NEXT UP – Robert F. Rodriguez video interview with Philippe Petit about the unique challenges and rewards of the famous walk, he also interviews Steve Boyle and speaks about his own special activities on that most memorable day. (regular subscribers will get an email when that is posted – Soon)
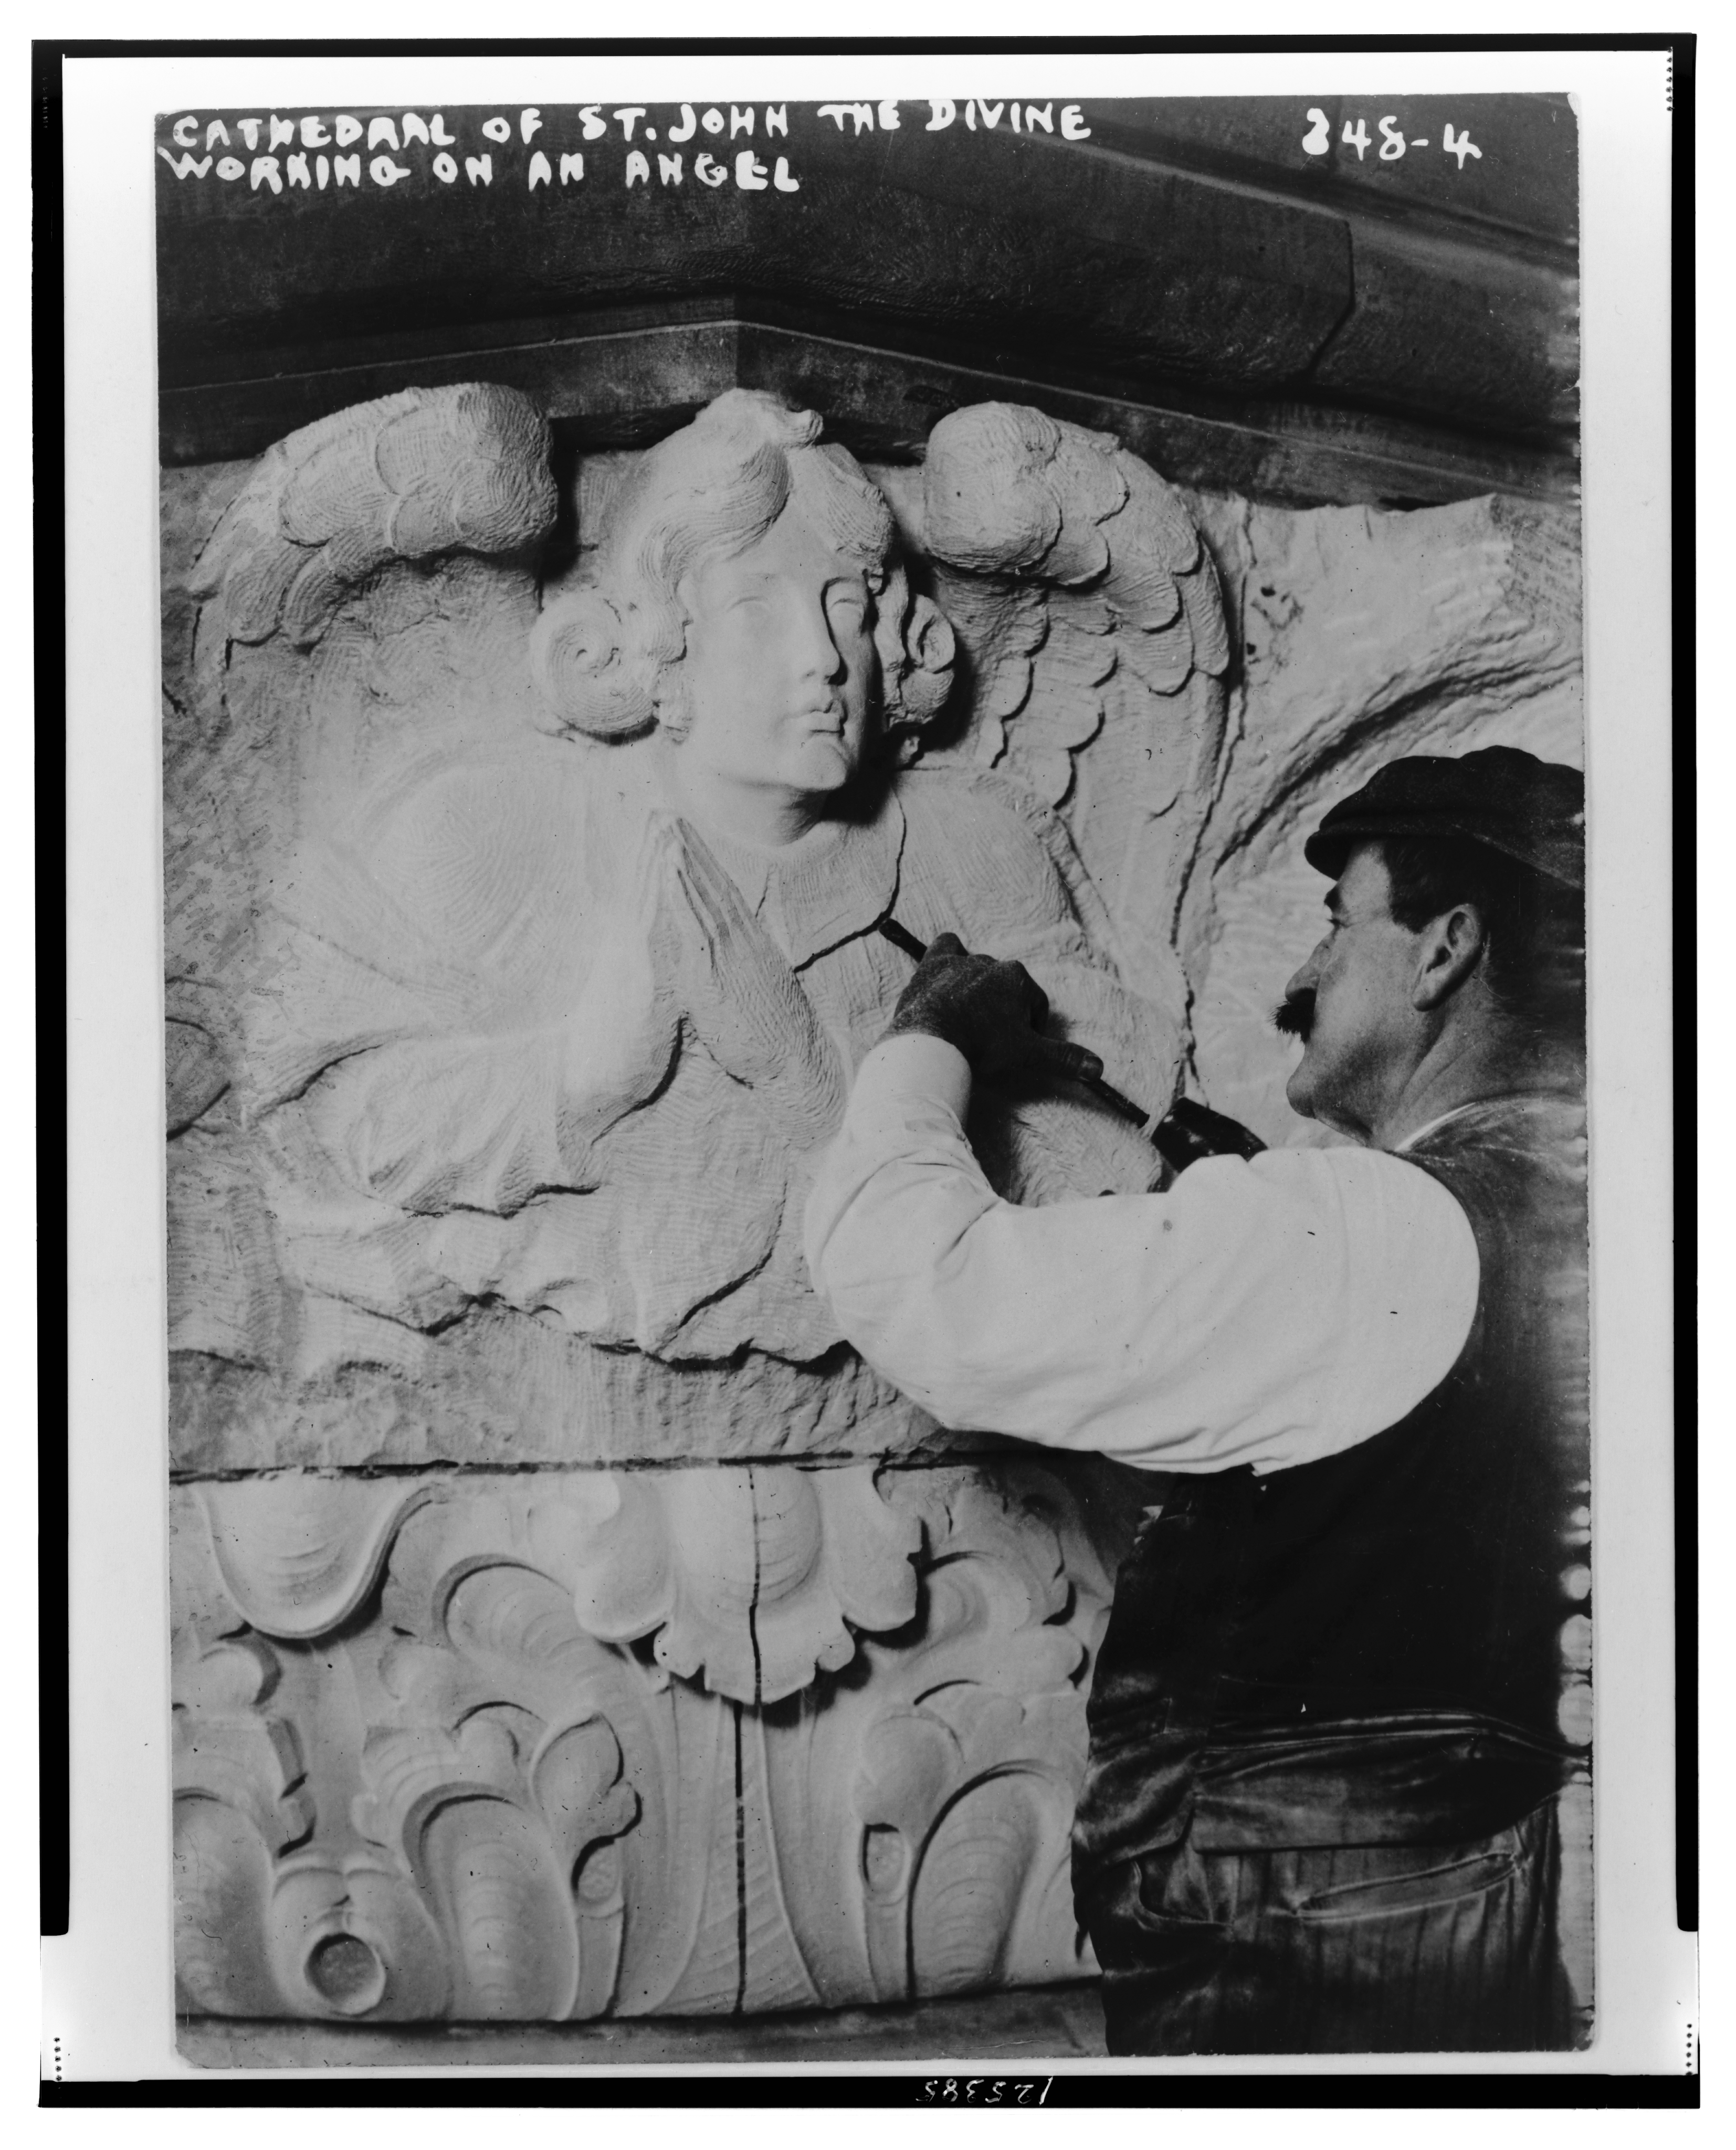
Clamanzio Celestino Ardolino carving a capital for the monumental column in the Chancel in situ. – 1909 photo, Bain News Service
Once the eight monumental columns were in place. The Cathedral rose around them. Atop these columns came the addition of Pierre de Lens limestone capitals. From these capitals, sprung roman arches for the Chancel dome. Then, the carving of the Chancel capitals commenced.
Octagonal capitals were first sculpted in clay by a Mr. Post representing singing angels. This may have been George Browne Post, a prominent New York City architect. He was know for his decorative designs.
Clay model between uncarved capital stones
The carving took place after the capitals were in place. For reference, the carvers had the clay model with them.
Clamanzio Celestino Ardolino is believed to be the man in the famous opening image of this article carving the Chancel capitals. He and his brother Ermalindo Eduardo Ardolino along with their first cousins Rafael and Domenico did a lot of carving at the Cathedral. There will be more about the Ardolino’s in a later post.
Finished Carvings
■
Images of capitals from the New York Public Library, Digital Collections
Image of Clamanzio Celestino Ardolino from The Genealogy of Torre le Nocelle, Italy: The Ardolino Brothers – Working on an Angel.